무엇이든 올리고, 링크로 공유하세요
DropHTML은 HTML·마크다운을 올리면 바로 공유 가능한 링크를 만들어 줍니다. 계정도, 빌드도, 설정도 필요 없어요. 아래는 알아두면 좋은 기능들입니다.
5분 안에 시작하기
처음이라면 이 네 단계만 보면 됩니다. 계정도, 설치도, 설정도 필요 없습니다.
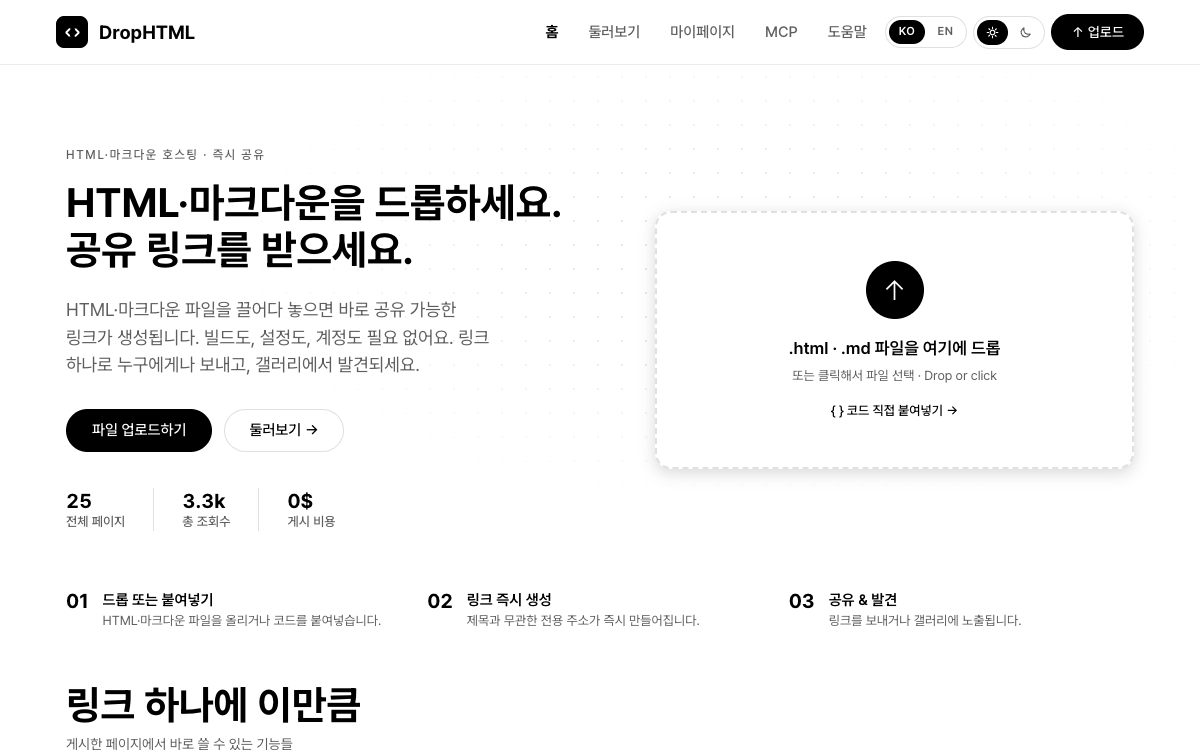
- 파일을 놓거나 코드를 붙여넣습니다.
홈 화면 가운데 영역에
.html·.md파일을 끌어다 놓으면 내용을 읽어 업로드 화면으로 넘어갑니다. 파일이 없으면 “{ } 코드 직접 붙여넣기”로 들어가 코드를 그대로 붙여넣거나 마크다운을 직접 쓰면 됩니다. - 제목·태그·공개 범위를 정하고 [게시하기 · Publish]를 누릅니다.
전부 선택 사항입니다. 비워 두면 제목은
Untitled, 태그는html, 공개 범위는 “공개”가 됩니다. 처음 게시할 때는 이용약관 동의 체크가 있어야 버튼이 활성화됩니다. - 만들어진 공유 링크를 복사해 보냅니다.
abcd1234.drophtml.app형태의 주소가 발급됩니다. 받는 사람은 계정 없이 링크만으로 바로 봅니다. - 같은 화면의 관리 링크를 저장해 둡니다. 관리 링크는 게시 직후 한 번만 표시되는, 그 글을 고치고 지우는 열쇠입니다. 로그인 없이 만든 글은 이 링크를 잃으면 되찾을 방법이 없습니다.
용어 풀이
이 도움말에 반복해서 나오는 말들입니다. 여기만 알면 나머지는 술술 읽힙니다.
- 공유 링크
- 게시할 때 글마다 발급되는 주소(
abcd1234.drophtml.app). 앞의 8글자는 제목과 아무 상관 없는 무작위 값이라, 주소를 바꿔 가며 남의 글을 찾아낼 수 없습니다. - 관리 링크
- 게시 직후 한 번만 표시되는 그 글 전용 편집·삭제 주소. 계정 없이도 “내 글”임을 증명하는 열쇠입니다.
- 링크 공유(unlisted)
- 둘러보기·검색·사이트맵 어디에도 실리지 않고, 링크를 아는 사람만 여는 공개 범위입니다.
- 핀 댓글
- 페이지 위 특정 지점에 꽂아 남기는 댓글. 화면 크기가 바뀌어도 가리키던 요소를 따라갑니다.
- 라이브 (같이 보기)
- 지금 같은 페이지를 보고 있는 사람들이 캐릭터로 나타나 실시간으로 대화하는 기능. 대화는 남지 않습니다.
- 수정 이력
- 본문을 바꿔 저장할 때마다 자동으로 쌓이는, 직전 내용들의 목록입니다.
- 세부 편집
- HTML 글을 코드 대신 마우스로 고치는 편집 화면(업로드·편집 화면의 버튼으로 엽니다).
- 마이페이지
- 내가 만든 글 목록. 로그인해서 만든 글은 계정에, 로그인 없이 만든 글은 이 브라우저에 저장됩니다.
만들기부터 공유까지
1) 올리기
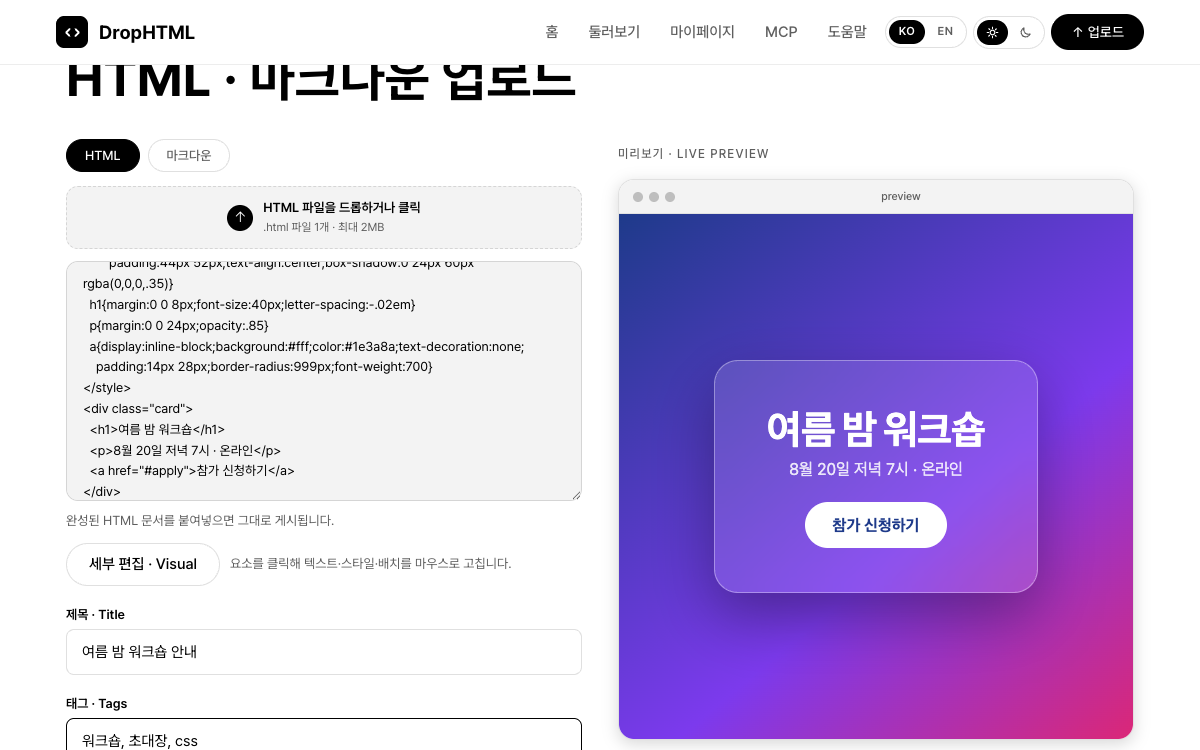
- 화면 맨 위에서 HTML과 마크다운 중 형식을 고릅니다. 홈에서 파일을 놓고 들어왔다면 확장자를 보고 자동으로 골라져 있습니다.
- 파일을 드롭하거나 클릭해 고르고, 아니면 코드·마크다운을 직접 입력합니다. HTML은
.html·.htm, 마크다운은.md·.markdown·.mdown·.mkd·.txt를 받습니다. - 제목·태그를 씁니다. 제목은 120자까지 저장되고, 태그는 쉼표로 구분해 앞에서부터 4개까지 쓰입니다.
- 필요하면 비밀번호를 걸고 공개 범위를 정합니다(자세히는 공개 범위와 비밀번호).
- 이용약관 동의에 체크하고 [게시하기 · Publish]를 누릅니다.
2) 결과 확인하기
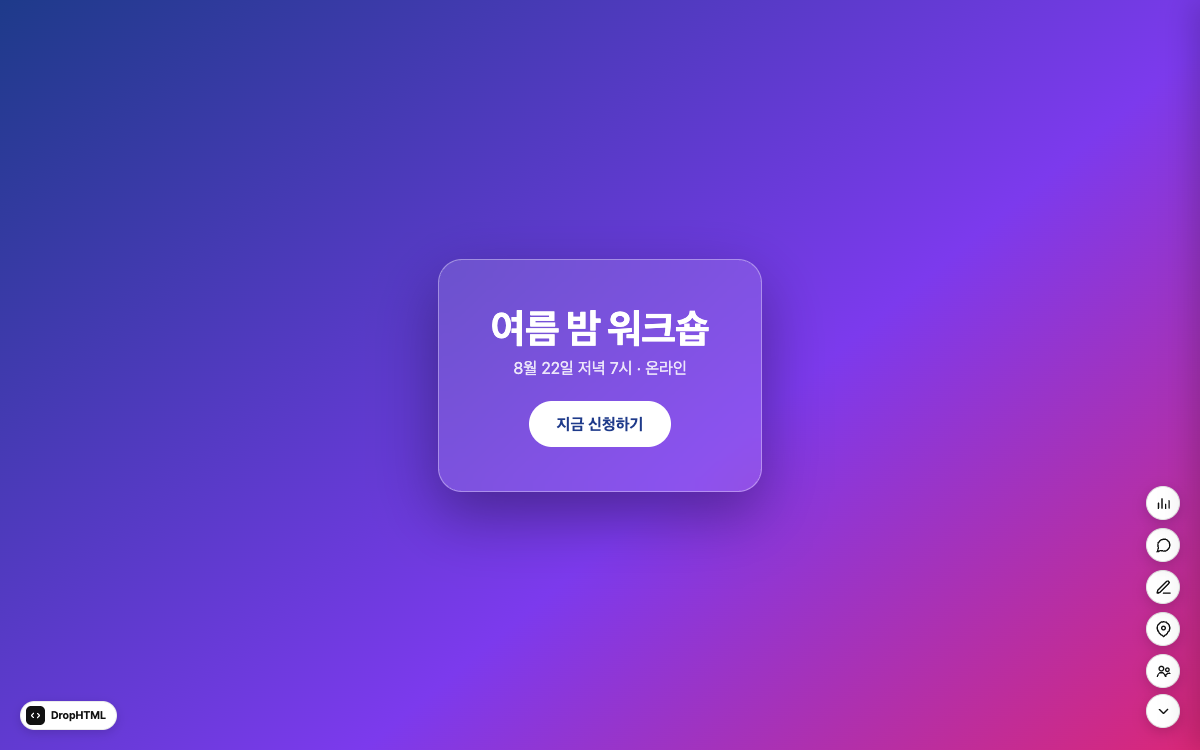
- 글마다 자기만의 주소를 쓰기 때문에 페이지 안의 자바스크립트·저장소·카메라 같은 브라우저 기능이 제약 없이 동작하고, 다른 글과 서로 섞이지 않습니다.
- 받는 사람은 계정도 앱도 필요 없습니다. 링크를 누르면 바로 열립니다.
- 게시한 글은 마이페이지 목록에도 자동으로 쌓입니다 — 로그인했다면 계정에, 아니면 이 브라우저에 저장됩니다.
마크다운
업로드 화면에서 마크다운 탭을 고르면 마크다운으로 쓴 글이 보기 좋은 페이지로 자동 렌더됩니다. 작성 화면의 미리보기와 실제 공유 페이지는 같은 렌더러를 쓰기 때문에 모양이 정확히 일치합니다.
- 제목·목록·강조·링크·이미지는 물론 표·코드 블록·인용문·구분선·체크리스트(
- [ ])까지 그려집니다. - 보는 사람이 페이지 안의 버튼으로 라이트·다크 테마를 직접 전환할 수 있습니다(기본값은 보는 사람의 기기 설정).
- 원본 마크다운이 그대로 보존되므로, 관리 링크로 다시 열면 마크다운 상태 그대로 재편집할 수 있습니다.
세부 편집
HTML로 올린 글은 코드 입력란 아래의 세부 편집 · Visual 버튼으로, 코드를 직접 고치지 않고 마우스로 다듬을 수 있습니다. 코드 입력란이 비어 있으면 열 것이 없어 버튼이 눌리지 않습니다.
- 세부 편집 · Visual을 누르면 전체 화면 편집기가 열립니다.
- 요소를 클릭해 텍스트·스타일·배치를 바꾸고, 레이어 목록·블록 추가·코드 보기로 문서 구조를 확인합니다.
- [적용]을 누르면 편집 결과가 HTML 코드 입력란에 되돌아옵니다.
- 저장은 평소와 같이 [게시하기] 또는 [수정 저장] 버튼으로 합니다 — 적용만으로는 저장되지 않습니다.
- 원본의
<head>·<style>·<script>는 보존됩니다 — 아무것도 고치지 않고 적용해도 문서가 그대로 남습니다. - 마크다운 글에는 이 버튼이 없습니다. 마크다운은 원본이 보존돼 그대로 다시 쓰는 것이 편집 방식입니다.
<style>을 건드리지 않고 보존하는 대신, 스타일 패널에는 기존 CSS 값이 채워지지 않고 계산된 값이 흐리게 보입니다. 값을 바꾸면 원본 뒤에 새 규칙이 추가되어 덮어쓰는 방식입니다.공개 범위와 비밀번호
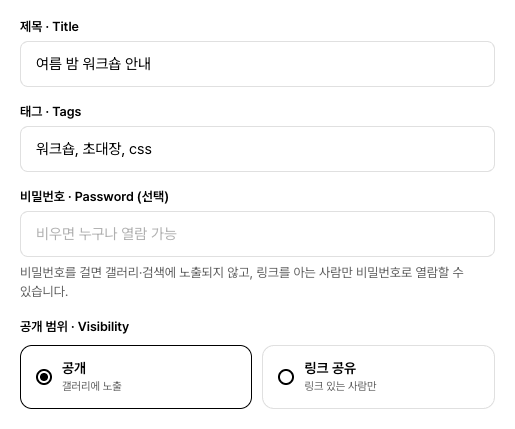
| 공개 범위 | 둘러보기·검색·사이트맵 | 링크를 아는 사람 | 그 밖의 사람 |
|---|---|---|---|
| 공개 | 실립니다 | 볼 수 있음 | 둘러보기에서 찾아 볼 수 있음 |
| 링크 공유 | 실리지 않습니다 | 볼 수 있음 | 주소를 모르면 닿을 수 없음 |
| 비밀번호 | 실리지 않습니다 | 비밀번호를 알아야 열람 | 주소를 모르면 닿을 수 없음 |
- 공유 링크의 앞 8글자는 제목과 무관한 무작위 값입니다. 주소를 하나씩 바꿔 가며 링크 공유 글을 찾아내는 일은 사실상 불가능합니다.
- 공개 범위는 나중에 관리 링크로 언제든 바꿀 수 있습니다.
- 비밀번호를 걸면 공개 범위가 “링크 공유”로 내려갑니다. 잠긴 글의 제목·태그·존재 자체가 목록에 드러나면 “여기 잠긴 글이 있다”고 알리는 셈이라, 공개로는 게시할 수 없습니다.
- 나중에 비밀번호를 지워도 공개 범위가 저절로 “공개”로 돌아가지는 않습니다. 편집 화면에서 직접 다시 골라 저장하세요.
내 글 편집·삭제 (관리 링크)
1) 관리 링크 받기
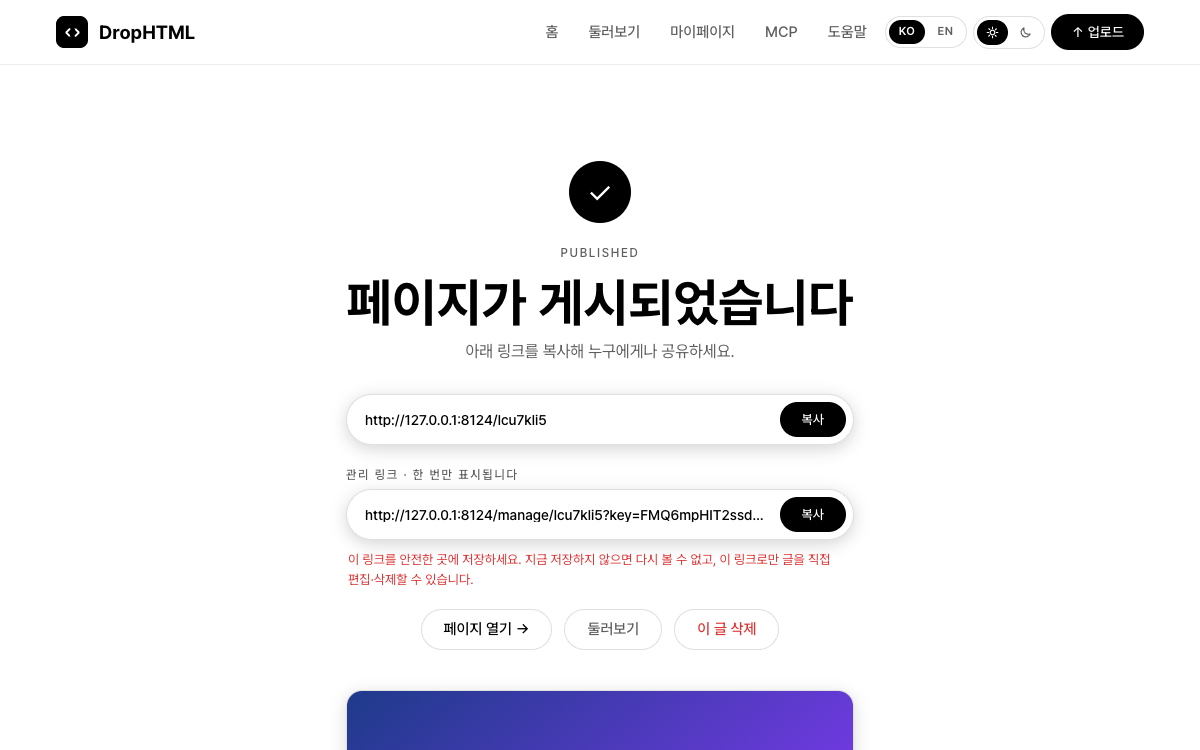
게시를 마치면 그 글 전용 관리 링크가 한 번 발급됩니다. 로그인 없이 게시한 글은 이 링크로만 본인이 편집하거나 삭제할 수 있습니다.
2) 편집하기
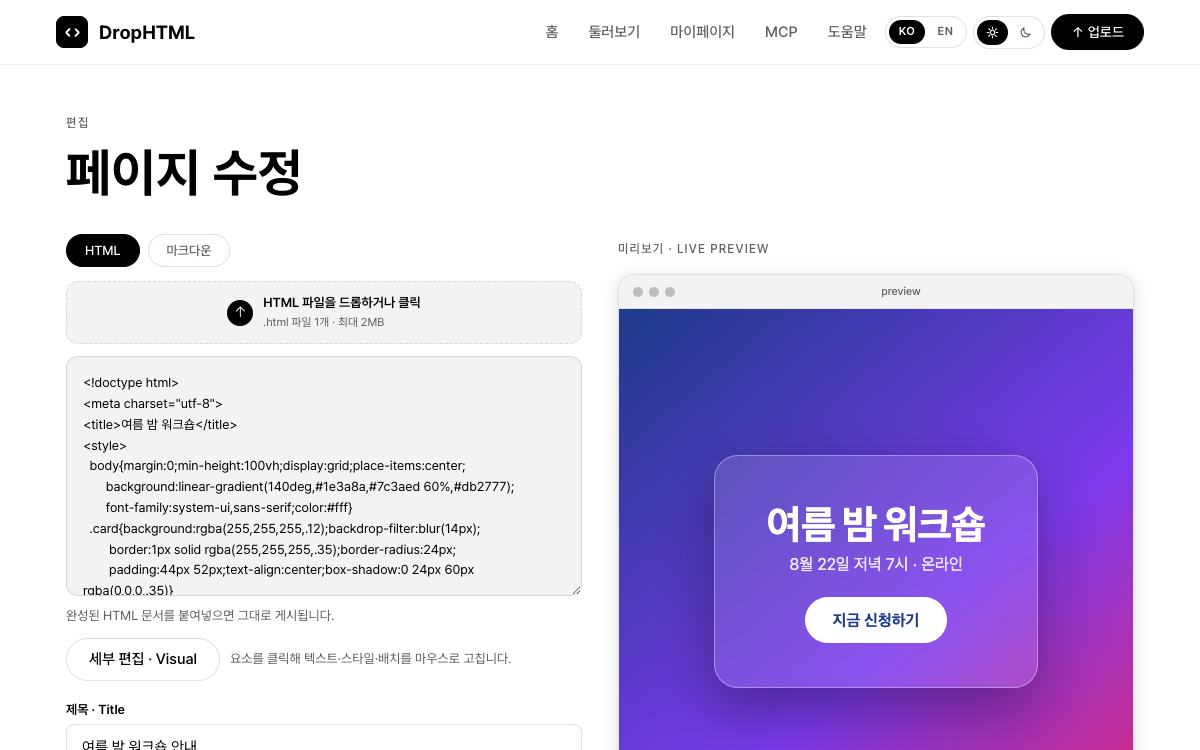
- 관리 링크를 브라우저 주소창에 붙여넣어 엽니다. (마이페이지 목록의 편집 버튼도 같은 화면으로 갑니다.)
- 내용·제목·태그·공개 범위·비밀번호를 고칩니다.
- [수정 저장 · Save]를 누릅니다. 공유 링크는 그대로이고 방문자는 다음 방문부터 새 내용을 봅니다.
- 글을 내리려면 같은 화면 아래 [이 글 삭제]를 누릅니다.
보안을 위해, 관리 링크로 들어가면 주소창의 열쇠 값은 즉시 지워집니다 — 브라우저 방문 기록이나 화면 공유에 열쇠가 남지 않습니다. 그래서 주소창을 복사해도 관리 링크가 되지 않습니다. 처음 받은 링크 원본을 보관하세요.
- 로그인 없이 게시한 글은 링크를 잃으면 복구할 방법이 없습니다. 발급 즉시 안전한 곳에 저장하세요.
- 단, 글을 만든 그 브라우저의 마이페이지에 목록이 남아 있다면 거기 편집 버튼으로 다시 들어갈 수 있습니다. 브라우저 데이터를 지우면 그것도 함께 사라지니, 마이페이지의 내보내기로 백업해 두세요.
- 구글 로그인 상태로 게시한 글은 링크 없이도 마이페이지에서 관리할 수 있습니다.
- 글 삭제는 되돌릴 수 없습니다. 본문·수정 이력·달린 댓글·방문 통계가 모두 함께 사라집니다.
수정 이력
본문을 바꿔 저장하면 직전 내용이 자동으로 이력에 남습니다. 따로 켤 것도, 저장 전에 챙길 것도 없습니다(제목·태그만 바꾼 저장은 이력을 만들지 않습니다).
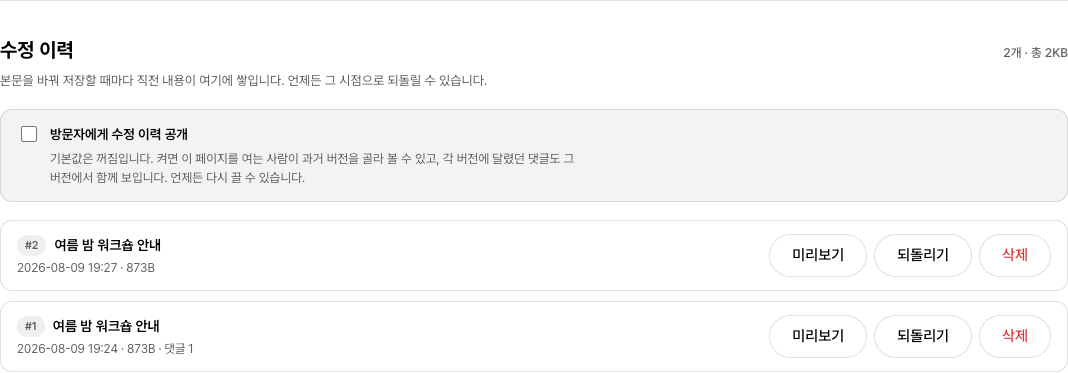
편집 화면 아래쪽 수정 이력 목록에서 지난 버전을 다룹니다.
- 각 버전을 미리보기로 열어 그때의 내용을 확인합니다.
- 되돌리기로 그 시점의 제목·태그·본문을 다시 현재 내용으로 만듭니다.
- 실수로 올린 내용은 그 버전만 골라 삭제할 수 있습니다. 영구 삭제라 되돌릴 수 없고, 그 버전에 달렸던 댓글도 함께 지워집니다.
되돌리기는 취소가 아니라 새 저장입니다. 되돌리기 직전의 내용도 이력에 그대로 남기 때문에, 잘못 되돌렸더라도 다시 원래대로 되돌아올 수 있습니다.
되돌려도 공개 범위와 비밀번호는 지금 설정 그대로 유지됩니다 — 되돌리기 때문에 링크 공유 글이 갑자기 갤러리에 공개되는 일을 막기 위해서입니다.
“방문자에게 수정 이력 공개”는 기본값이 꺼짐입니다. 켜면 페이지를 여는 사람이 도구 모음의 수정 이력에서 과거 버전을 골라 볼 수 있고, 언제든 다시 끌 수 있습니다.
과거 버전 화면에는 “이 페이지는 저장된 이전 버전입니다” 배너가 뜨고 읽기 전용으로 열립니다 — 새 댓글을 남기거나 라이브에 들어갈 수는 없습니다.
구글 로그인 (선택)
DropHTML은 계정 없이도 모든 기능을 쓸 수 있습니다. 다만 구글 로그인을 하면 글 관리가 편해집니다.
- 로그인 상태로 게시한 글은 내 계정에 연결됩니다 — 관리 링크 없이도 마이페이지 “내 계정 글”에서 어느 기기에서든 편집·삭제할 수 있습니다.
- 로그인 없이 만든 글(이 브라우저에 저장)도 마이페이지의 “내 계정에 연결” 버튼으로 계정에 옮길 수 있습니다.
- 로그인하지 않고 쓰더라도 마이페이지의 내보내기·가져오기로 이 브라우저에 쌓인 목록을 파일로 저장했다가 다른 브라우저·기기에서 되살릴 수 있습니다.
- AI 에이전트 연동용 MCP API 키도 로그인 후 마이페이지에서 발급합니다(MCP 가이드 참고).
- 계정을 삭제해도 글은 지워지지 않고 익명으로 보존됩니다 — 관리 링크가 있는 글은 그 링크로 계속 관리할 수 있습니다.
둘러보기와 태그
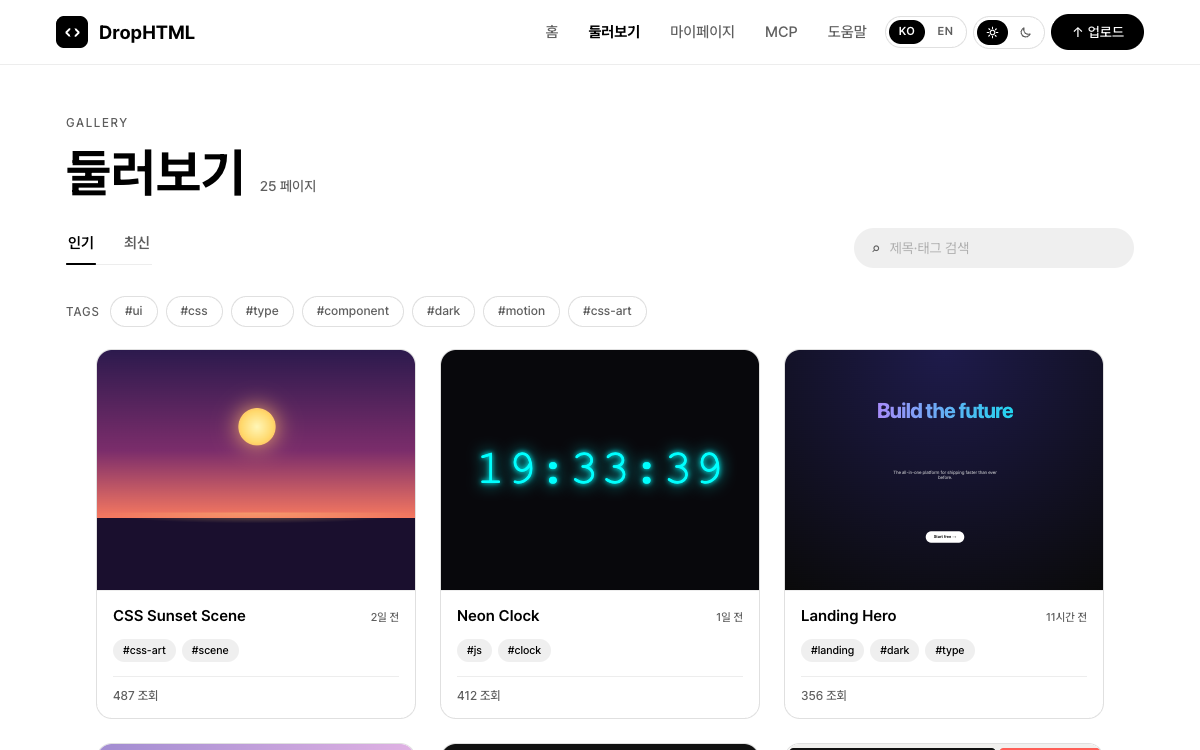
둘러보기에는 공개로 게시된 글이 모입니다. 인기·최신 탭으로 정렬을 바꾸고, 제목·태그로 검색할 수 있습니다.
- 게시할 때 넣은 태그가 목록의 태그 칩이 되어, 같은 주제의 글로 이어집니다(글 하나에 앞에서부터 4개까지).
- 목록의 카드는 실제 페이지를 축소한 미리보기를 보여 주고, 카드를 누르면 상세에서 내용을 확인한 뒤 원본 링크로 갈 수 있습니다.
- 페이지 아래의 더 보기로 목록을 이어서 받습니다.
- 링크 공유·비밀번호 글은 여기에 뜨지 않습니다 — 검색에도, 사이트맵에도 실리지 않습니다.
핀 댓글
링크를 받은 사람은 계정 없이도 공유 페이지 오른쪽 아래 구석의 도구 모음을 씁니다 — 핀 댓글·라이브·그리기·방문 통계가 모두 방문자용 기능입니다.
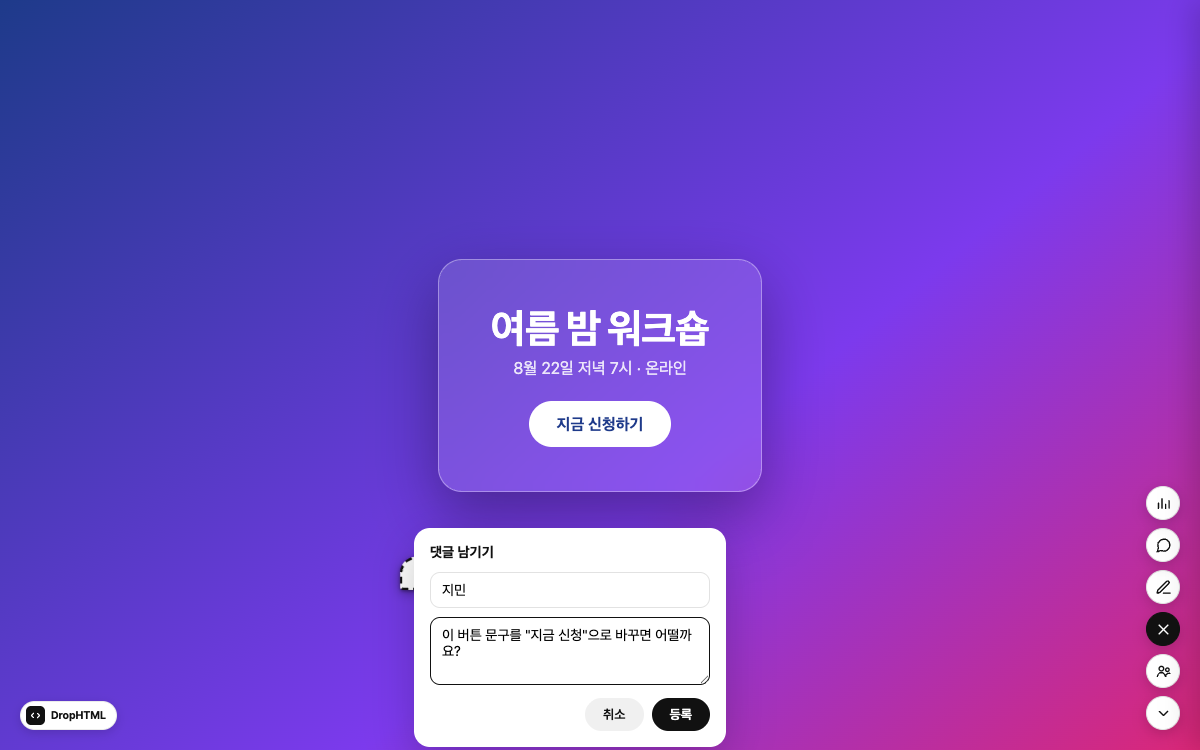
- 오른쪽 아래 도구 모음에서 핀 보기 버튼을 눌러 핀 모드를 켭니다.
- 의견을 남길 지점을 클릭하면 입력창이 열립니다(라이브에 함께 들어가 있다면 더블클릭입니다 — 한 번 클릭은 캐릭터 이동에 쓰입니다).
- 이름과 내용을 적어 등록하면 그 자리에 핀이 꽂힙니다.
- 핀을 클릭하면 스레드가 열려 1단계 답글을 달 수 있습니다.
- 댓글 목록 버튼을 누르면 오른쪽 패널에 전체 댓글이 모여 나오고, 각 카드의 위치 버튼으로 해당 핀까지 스크롤됩니다.
- 핀은 가리키던 요소에 고정돼, 창 크기가 바뀌거나 모바일에서 열어도 자리를 따라갑니다.
- 로그인 없이 그때그때 이름만 입력하는 익명 방식입니다(이름은 그 방문 동안만 기억됩니다).
라이브 (같이 보기)
같은 페이지를 지금 함께 보고 있는 사람들이 서로 보이는 기능입니다. 캐릭터를 하나 골라 입장하면 페이지 위를 돌아다니며 대화할 수 있습니다.
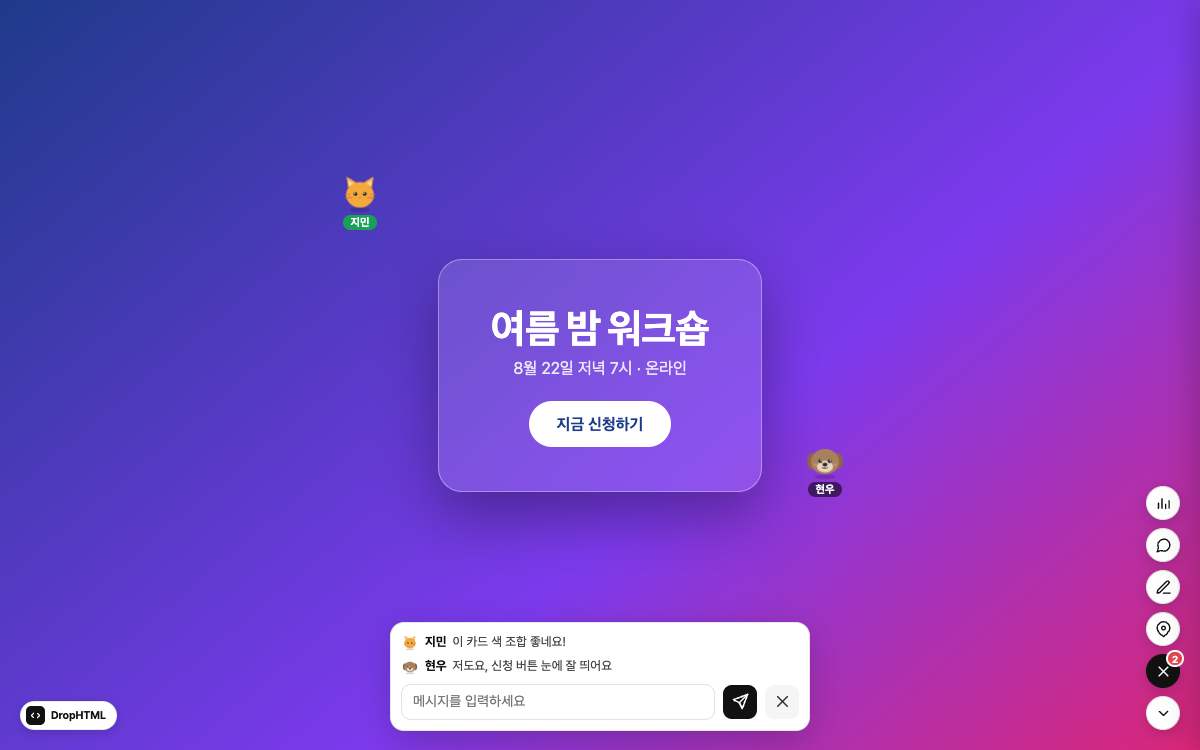
- 오른쪽 아래 도구 모음에서 라이브 버튼을 누릅니다.
- 캐릭터를 고르고 이름을 적어 입장합니다.
- 페이지의 빈 곳을 클릭해 이동하고, 아래 입력창으로 이야기합니다.
- 나갈 때는 같은 버튼을 다시 누르거나 그냥 페이지를 닫으면 됩니다.
- 고양이·강아지·곰·토끼·개구리·병아리·유령·로봇 8종 중에 고르고, 이름은 그때그때 입력하는 익명입니다.
- 페이지의 빈 곳을 클릭하면 캐릭터가 그쪽으로 걸어갑니다(링크·버튼 클릭은 원래대로 동작합니다).
- 아래 입력창에 메시지를 보내면 내 캐릭터 위에 말풍선이 뜨고, 최근 대화가 목록에 쌓입니다.
- 캐릭터가 문서에 붙어 있어 누가 어느 부분을 보고 있는지 드러납니다 — 같은 화면을 짚어가며 이야기할 때 좋습니다.
- 대화는 남지 않습니다(약 10분 뒤 사라짐). 기록으로 남길 의견은 핀 댓글을 쓰세요.
- 페이지를 닫으면 캐릭터도 함께 사라집니다(약 45초 안에 다른 사람 화면에서도 없어집니다).
그리기 도구
펜으로 공유 페이지 위에 자유롭게 그릴 수 있습니다. 오른쪽 아래 도구 모음의 그리기 버튼으로 켜고 끕니다.
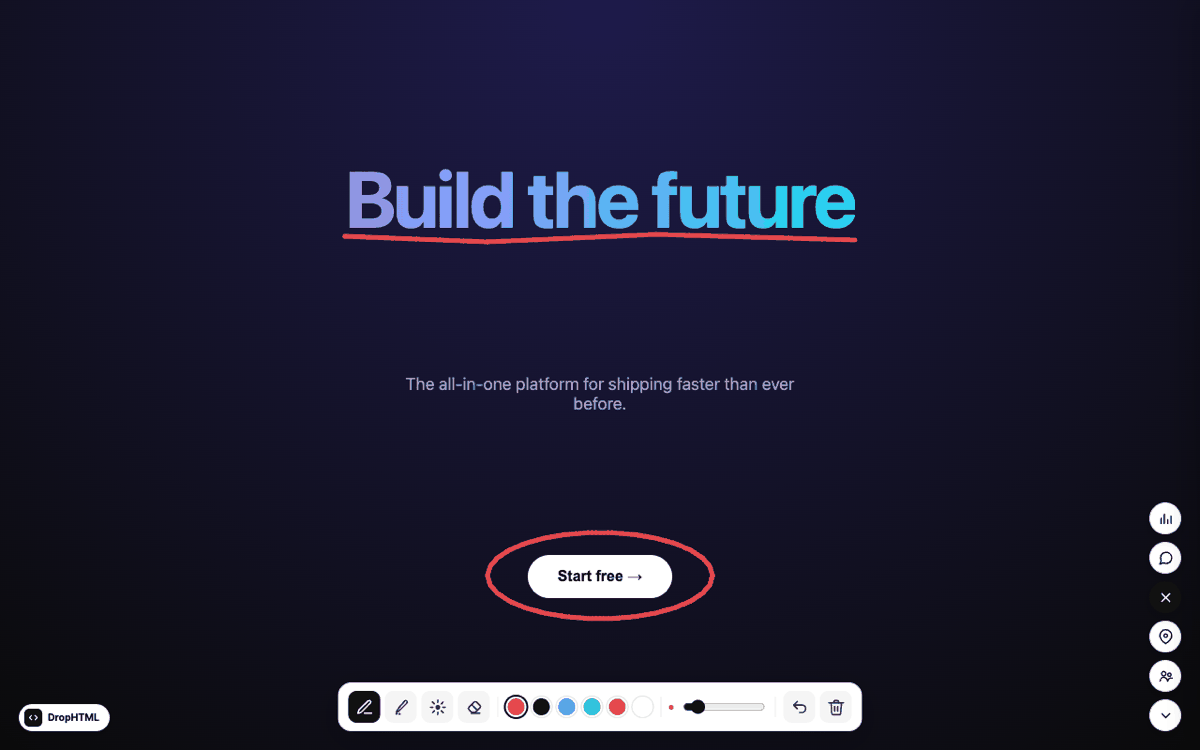
- 펜·분필·레이저포인터·지우개 도구에 색상·굵기를 고르고, 실행취소·전체 지우기도 됩니다.
- 레이저포인터는 잠깐 남았다 사라져, 마우스로 짚어가며 설명하기 좋습니다.
- 그림은 스크롤하거나 창 크기를 바꿔도 콘텐츠를 따라 함께 움직입니다.
- 내 화면에만 보이는 임시 표시라 저장되지 않고, 다른 사람이나 작성자에게도 보이지 않습니다.
방문 통계
공유 페이지 오른쪽 아래 도구 모음의 방문 통계 버튼을 누르면, 그 페이지가 얼마나 열렸는지 한눈에 볼 수 있습니다.
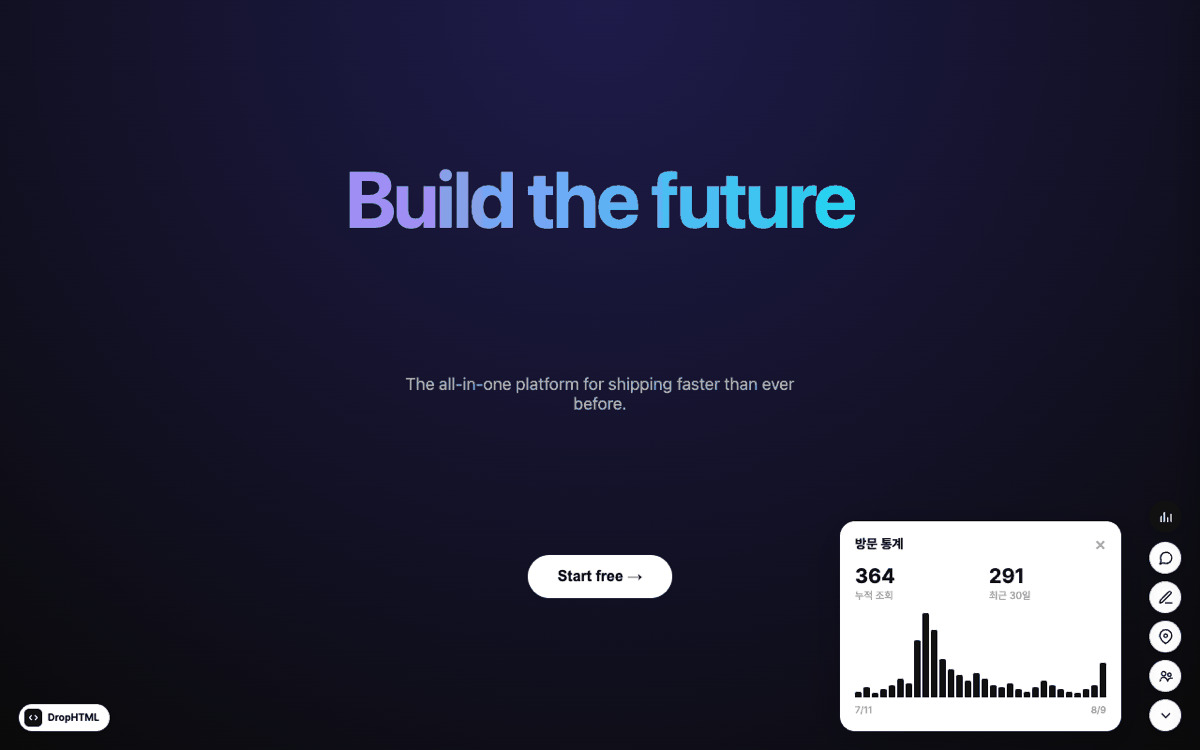
- 누적 조회수와 최근 30일 합계를 함께 보여줍니다.
- 일별 방문수 막대 차트로 추이를 확인하고, 막대에 마우스를 올리면 그날의 횟수가 뜹니다.
- 로그인 없이 누구나 볼 수 있는 공개 지표입니다 — 방문자를 개별 추적하지는 않습니다.
제한과 원칙
| 항목 | 제한 |
|---|---|
| 본문 크기 | 글 하나당 최대 2MB |
| 제목 | 최대 120자(넘으면 잘립니다). 비우면 Untitled |
| 태그 | 앞에서부터 4개까지. 비우면 html 하나가 붙습니다 |
| 올릴 수 있는 파일 | HTML(.html·.htm) · 마크다운(.md·.markdown·.mdown·.mkd·.txt), 한 번에 1개 |
| 라이브 대화 | 약 10분 뒤 사라짐(저장되지 않음) |
| 보관 | 30일 이상 아무도 열지 않은 페이지는 삭제될 수 있습니다 |
- 계정 없이 사용 가능 · 추적 없음 · 무료. 구글 로그인은 선택입니다.
- 페이지 방문은 날짜별 횟수로만 집계하고, 방문자를 개별로 식별하거나 저장하지 않습니다.
- 내가 만들었거나 게시할 정당한 권한이 있는 콘텐츠만 올려 주세요.
- 짧은 시간에 너무 많이 만들거나 저장하면 잠시 제한될 수 있습니다. 잠깐 기다린 뒤 다시 시도하면 됩니다.
저작권·권리침해 신고
권리를 침해하는 콘텐츠를 발견하면 아래 주소로 신고해 주세요. 확인 후 신속히 조치합니다. 이용약관 전문은 홈 화면 하단에서 볼 수 있습니다.
✉ contact@drophtml.app자주 묻는 질문
DropHTML은 어떻게 시작하나요?
마크다운을 지원하나요?
공개 범위와 비밀번호는 어떻게 설정하나요?
내 글을 편집하거나 삭제하려면 어떻게 하나요?
계정(로그인)이 필요한가요?
글을 수정하면 링크가 바뀌나요?
수정하기 전 내용은 어떻게 되나요?
글을 수정했더니 댓글이 안 보여요.
어떤 파일을 올릴 수 있나요?
.html) 파일과 마크다운(.md·.markdown·.txt) 파일을 드롭하거나, 코드를 붙여넣거나 마크다운을 직접 작성할 수 있습니다. 글 하나당 본문 최대 2MB입니다.내 글이 검색 엔진에 노출되나요?
방문자는 어떤 기능을 쓸 수 있나요?
용량이나 보관 기간에 제한이 있나요?
AI 에이전트에서 바로 게시할 수 있나요?
https://drophtml.app/mcp URL을 등록하면, 에이전트가 대화 중에 페이지를 게시·검색·편집·삭제합니다. 등록 방법과 도구 목록은 MCP 가이드를 참고하세요.관리 링크를 잃어버렸어요. 되찾을 수 있나요?
게시 완료 화면을 관리 링크를 저장하기 전에 닫았어요.
공유 주소가 왜 무작위 문자열로 시작하나요?
이미지·CSS·JS 파일을 따로 올릴 수 있나요?
<style>·<script>·data URI) 외부 주소로 연결해 주세요. 본문 전체가 2MB 한도 안에 들어가야 합니다.제목이나 태그에 길이 제한이 있나요?
Untitled, 태그를 비우면 html이 자동으로 붙습니다.글을 삭제하면 댓글과 수정 이력도 사라지나요?
방문자에게 지난 버전을 보여주고 싶어요.
비밀번호를 걸었더니 공개로 바꿀 수 없어요.
라이브에서 나눈 대화를 저장할 수 있나요?
제가 그린 그림이 다른 사람에게도 보이나요?
Drop anything, share it with a link
DropHTML turns an HTML or Markdown file into a shareable link instantly. No account, no build, no config. Here are the things worth knowing.
Start in five minutes
If this is your first time, these four steps are all you need. No account, no install, no config.
- Drop a file or paste your code.
Drag a
.htmlor.mdfile onto the area in the middle of the home screen and it is read and carried into the upload screen. No file? Use “{ } Paste code directly” and paste your code or write Markdown there. - Set a title, tags, and visibility, then press [Publish].
All of it is optional. Left empty, the title becomes
Untitled, the tag becomeshtml, and visibility stays “Public”. The first time you publish, the Terms checkbox has to be ticked before the button turns on. - Copy the share link and send it.
You get an address like
abcd1234.drophtml.app. Recipients open it straight from the link — no account required. - Save the manage link on the same screen. The manage link is shown only once, right after publishing, and it is the key to editing and deleting that page. For pages made without signing in, losing it means losing that access for good.
Glossary
These words come up again and again below. Learn them here and the rest reads easily.
- Share link
- The address issued for each page when you publish (
abcd1234.drophtml.app). Those first eight characters are random and unrelated to the title, so nobody can find other people's pages by editing the address. - Manage link
- A per-page edit/delete address, shown only once right after publishing. It is what proves a page is yours without an account.
- Unlisted
- A visibility level that keeps a page out of Browse, search, and the sitemap — only people with the link can open it.
- Pinned comment
- A comment pinned to a specific spot on the page. It follows the element it points at even when the screen size changes.
- Live (watch together)
- Everyone reading the same page right now appears as a character and can talk in real time. Nothing is kept afterwards.
- Revision history
- The list of previous contents, added automatically every time you save a change to the body.
- Visual editing
- An editor that lets you change an HTML page with the mouse instead of the code (opened from a button on the upload/edit screen).
- My Pages
- The list of pages you made. Pages published while signed in live in your account; pages made without signing in live in this browser.
From publishing to sharing
1) Publishing
- Pick the format at the top — HTML or Markdown. If you arrived by dropping a file on the home screen, it is already picked from the file extension.
- Drop or choose a file, or type the code or Markdown yourself. HTML accepts
.htmland.htm; Markdown accepts.md,.markdown,.mdown,.mkd, and.txt. - Add a title and tags. Titles are stored up to 120 characters; tags are comma-separated and the first four are used.
- Set a password and visibility if you need them (see Visibility & passwords).
- Tick the Terms checkbox and press [Publish].
2) Seeing the result
- Every page gets its own address, so the JavaScript, storage, and camera access inside it work without restrictions and never mix with another page.
- Recipients need no account and no app. The link just opens.
- Published pages also collect in My Pages — in your account if you are signed in, otherwise in this browser.
Markdown
Pick the Markdown tab on the upload screen and what you write renders into a clean page. The preview and the published page use the same renderer, so they match exactly.
- Headings, lists, emphasis, links, and images, plus tables, code blocks, blockquotes, rules, and task lists (
- [ ]). - Viewers can switch light/dark theme with a button right on the page (defaults to their device setting).
- Your original Markdown is preserved, so reopening with the manage link lets you re-edit it as Markdown.
Visual editing
For HTML pages, the Visual editor button below the code box lets you tweak the page with your mouse instead of editing the code by hand. With an empty code box there is nothing to open, so the button stays disabled.
- Press Visual editor to open the full-screen editor.
- Click an element to change its text, style, and layout, and use the layer list, block library, and code view to inspect the structure.
- Press Apply and the result goes back into the code box.
- Save as usual with [Publish] or [Save changes] — applying alone does not save anything.
- The original
<head>,<style>, and<script>are preserved — applying without changing anything leaves your document exactly as it was. - Markdown pages do not have this button: your Markdown source is preserved, so you simply edit it again as Markdown.
<style> is kept untouched, the style panel does not come pre-filled with your CSS values — it shows the computed values greyed out. Changing one adds a new rule after the original that overrides it.Visibility & passwords
| Visibility | Browse, search, sitemap | People with the link | Everyone else |
|---|---|---|---|
| Public | Listed | Can view | Can find it in Browse |
| Unlisted | Not listed | Can view | Cannot reach it without the address |
| Password | Not listed | Needs the password | Cannot reach it without the address |
- The first eight characters of a share link are random and unrelated to the title. Discovering unlisted pages by trying addresses one after another is not realistically possible.
- Visibility can be changed later at any time through the manage link.
- Setting a password drops visibility to “Unlisted”. If a locked page's title, tags, or mere existence showed up in listings, that would advertise “there is a locked page here” — so publishing it publicly is not allowed.
- Removing the password later does not put visibility back to “Public” on its own. Pick it again on the edit screen and save.
Editing & deleting your page (manage link)
1) Getting the manage link
Publishing gives you a one-time manage link for that page. For pages published without signing in, it is the only way for you to edit or delete the page.
2) Editing
- Paste the manage link into your browser's address bar and open it. (The Edit button in My Pages goes to the same screen.)
- Change the content, title, tags, visibility, or password.
- Press [Save changes]. The share link stays the same, and visitors see the new content from their next visit.
- To take the page down, press [Delete this page] lower on the same screen.
For safety, the key in the address bar is wiped the moment you open a manage link, so it never lingers in browser history or on a shared screen. That also means copying the address bar does not give you the manage link — keep the original you were given.
- For pages published without signing in there is no way to recover it if lost, so save it somewhere safe immediately.
- That said, if the page is still listed in My Pages in the browser you made it with, the Edit button there gets you back in. Clearing browser data clears that too — back it up with Export in My Pages.
- Pages published while signed in with Google stay manageable from My Pages without the link.
- Deleting a page cannot be undone. The content, its revision history, its comments, and its visit stats all go with it.
Revision history
Every save that changes the content keeps the previous one automatically. There is nothing to turn on and nothing to prepare before saving (saves that only change the title or tags do not add a revision).
The Revision history list at the bottom of the edit screen is where you work with past versions.
- Preview any version to see exactly what it held.
- Restore brings that version's title, tags, and content back as the current content.
- Published something by mistake? Delete just that version. It is a permanent deletion that cannot be undone, and the comments left on that version go with it.
Restoring is a new save, not an undo. The content you had right before restoring stays in the history too, so even a wrong restore can be rolled forward again.
Restoring keeps your visibility and password exactly as they are now — so a restore can never turn an unlisted page into a public one by surprise.
“Show revision history to visitors” is off by default. Turn it on and anyone opening the page can pick past versions from Revision history in the toolbar; you can turn it off again at any time.
A past version opens read-only behind a banner saying it is a saved earlier version — new comments and Live are not available there.
Google sign-in (optional)
Everything on DropHTML works without an account. Signing in with Google just makes managing your pages easier.
- Pages published while signed in are linked to your account — edit or delete them from any device under “My account pages” in My Pages, no manage link needed.
- Pages created without signing in (stored in this browser) can be moved to your account with the “Link to my account” button in My Pages.
- Even without signing in, Export and Import in My Pages save the list held in this browser to a file and bring it back on another browser or device.
- The MCP API key for AI-agent integration is also issued in My Pages after signing in (see the MCP guide).
- Deleting your account does not delete your pages — they are kept anonymously, and any page whose manage link you hold stays manageable through that link.
Browse & tags
Browse collects everything published as public. Switch between the Popular and Recent tabs, or search by title and tag.
- The tags you add when publishing become tag chips in the listing, linking your page to others on the same topic (the first four per page).
- Cards show a scaled-down preview of the real page; open one to read the details before jumping to the page itself.
- Load more at the bottom continues the listing.
- Unlisted and password-protected pages never appear here — they stay out of search and the sitemap as well.
Pinned comments
Anyone with the link uses a small toolbar in the bottom-right corner of a shared page, no account needed — pinned comments, Live, drawing, and visit stats are all visitor features.
- Press the pins button in the bottom-right toolbar to turn pin mode on.
- Click the spot you want to comment on and an input opens. (If you also joined Live, double-click instead — a single click moves your character.)
- Type a name and your comment, submit, and a pin lands there.
- Click a pin to open its thread and add a one-level reply.
- The comment list button collects every comment in a side panel; the location button on each card scrolls to that pin.
- Pins are anchored to the element they point at, so they hold their place when the window is resized or the page is opened on a phone.
- No login required. It is anonymous, so you just enter a name each time (remembered only for that visit).
Live (watch together)
Live shows everyone reading the same page right now. Pick a character to join, and you can wander across the page and talk.
- Press the Live button in the bottom-right toolbar.
- Pick a character, type a name, and join.
- Click an empty spot to move, and use the input bar at the bottom to talk.
- Leave with the same button, or just close the page.
- Choose from 8 characters — cat, dog, bear, rabbit, frog, chick, ghost, and robot. Names are anonymous: you just type one each time.
- Click an empty spot on the page and your character walks there (links and buttons keep working as usual).
- Send a message from the input at the bottom and it appears as a speech bubble above your character, with recent messages collected in a list.
- Characters stick to the document, so it is clear who is looking at which part — great for talking through the same screen together.
- Conversations are not kept (they disappear after about 10 minutes). For feedback worth keeping, use pinned comments.
- Close the page and your character leaves with you (gone from everyone else's screen within about 45 seconds).
- Conversations disappear after about 10 minutes. Anything worth keeping belongs in pinned comments.
- Live and drawing cannot be on at the same time — drawing takes over dragging entirely. If a switch would cost you something, a confirmation comes first.
- A past version view has no Live button at all: everyone there is looking at a different snapshot, so sharing positions would mean nothing.
Drawing tool
Draw freely right on top of a shared page. Turn it on and off with the drawing button in the bottom-right toolbar.
- Pick from pen, chalk, laser pointer, and eraser, choose a color and thickness, and undo or clear all.
- The laser pointer trail fades on its own, great for pointing things out as you talk.
- Your drawing sticks to the content, following along as you scroll or resize the window.
- It is a temporary mark visible only to you — nothing is saved, and no one else (not even the author) sees it.
Visit stats
Press visit stats in the bottom-right toolbar of a shared page to see how often it has been viewed, at a glance.
- Shows the total view count alongside the last 30 days total.
- A daily views bar chart shows the trend; hover a bar for that day's count.
- It is a public metric anyone can see, no login needed — individual visitors are not tracked.
Limits & principles
| Item | Limit |
|---|---|
| Content size | Up to 2MB per page |
| Title | Up to 120 characters (longer titles are cut). Empty becomes Untitled |
| Tags | The first 4 are used. Empty gets a single html tag |
| Accepted files | HTML (.html, .htm) · Markdown (.md, .markdown, .mdown, .mkd, .txt), one at a time |
| Live conversations | Gone after about 10 minutes (never stored) |
| Retention | A page that no one opens for 30+ days may be removed |
- No account needed · No tracking · Free. Google sign-in is optional.
- Visits are counted per day as a number only — individual visitors are never identified or stored.
- Only upload content you created or have the right to publish.
- Creating or saving very rapidly may be throttled for a moment. Wait a bit and try again.
Copyright & abuse reports
If you find infringing content, report it to the address below and we will act promptly. The full Terms of Service are available at the bottom of the home page.
✉ contact@drophtml.appFrequently asked questions
How do I get started with DropHTML?
Do you support Markdown?
How do visibility and passwords work?
How do I edit or delete my page?
Do I need an account?
Does the link change when I edit my page?
What happens to the content I had before an edit?
My comments disappeared after I edited the page.
What files can I upload?
.html) or Markdown (.md, .markdown, .txt) file, paste code, or write Markdown directly. Each page holds up to 2MB of content.Will my page appear in search engines?
What can visitors do?
Are there size or retention limits?
Can AI agents publish directly?
https://drophtml.app/mcp with an MCP client such as Claude Code, Claude Desktop, or Cursor, and the agent can publish, search, edit, and delete pages mid-conversation. See the MCP guide for setup and the tool list.I lost my manage link. Can I get it back?
I closed the completion screen before saving the manage link.
Why does my share address start with a random string?
Can I upload images, CSS, or JS as separate files?
<style>, <script>, data URIs) or link them from an external address. The whole body has to fit within the 2MB limit.Are there length limits on titles and tags?
Untitled and empty tags become html.